Shrimp and Saffron Risotto

(let's try this without the ketchup)

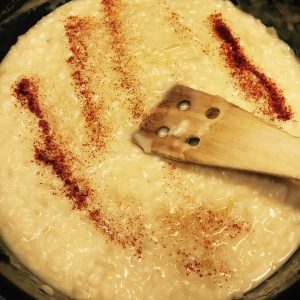
Risotto is just the best thing. I know that now. However, when I was younger (probably well in to my twenties actually) I thought risotto was… something other than it is. At home, it was more akin to fried rice, with some chopped ham or chicken and quite commonly: a mix of peas, corn and paprika (this one!). In the school diner risotto was a weird, gooey meat ragu type thing with rice in it, that for some reason always tasted aggressively sweet. Like really ketchupy sweet. Most likely explained by them putting a LOT of ketchup into it. Actually… thinking about it: growing up, the combination rice and ketchup was a strangely frequent occurrence.

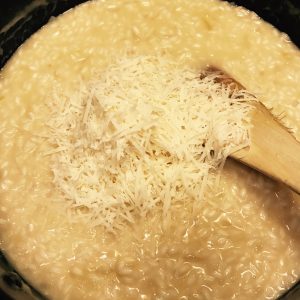
So let’s just get some things straight about what risotto actually is. It’s rice, and it can be any type of rice. Most commonly though, it’s a type with quite large grains that release starch when cooked in a way that creates a wonderfully creamy texture. It’s broth, it’s wine (usually white) and almost always cheese (usually parmigiano). So what’s up with that rice? Well, it has to do with the chemical composition of the starch. Here’s some science stuff from Serious Eats:

“Rice contains two molecules that make up its starch content, amylose, and amylopectin. Generally speaking, rices with a higher proportion of amylopectin to amylose will tend to soften more completely and thicken their sauce more strongly. All risotto starts with a short- to medium-grain form of rice high in amylopectin. It’s the exact ratio of amylose to amylopectin that determine the final texture of your rice and sauce.”

In Sweden, you tend to see three type of grains meant for risotto: Arborio, Carnaroli and Avorio. Arborio has the largest grain and creates the most creamy result. Carnaroli gets you a firmer result and Avorio even more so (I tend to really like Avorio). Obviously, what dish you’re preparing can guide the type of rice, but make sure to try them all to see which you like best in various situations.

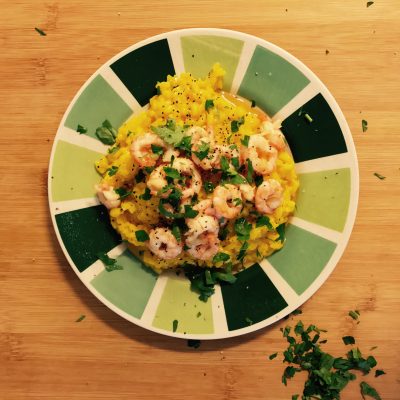
This is my favorite kind of run-of-the-mill risotto recipe and it’s real easy to make.

Ingredients

  • For the risotto (including shrimp and garnish)
  • 330 grisotto rice (in this recipe, I use Arborio)
  • 0.3 lwhite wine (3 dl)
  • 80 gparmigiano reggiano
  • 1 lshrimp broth
  • 800 gunpeeled shrimp
  • 1 handfulfresh parsley
  • 1 yellow onions
  • 0.5 gsaffron
  • 50 gbutter
  • 30 golive oil
  • For the broth
  • salt and white pepper corns
  • roasted shrimp shells
  • 3 yellow onions
  • 3 bay leaves

Directions

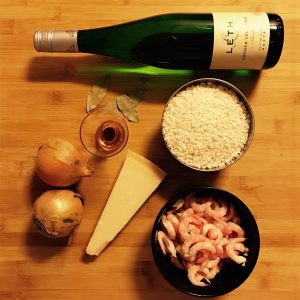
This recipe is for 4-5 people. Generally, some 80 g of rice equals a big portion. From start to finish this should take circa 1 hour and 30 min, if you’re starting from scratch.

A couple of things are really important when making risotto in general and this one specifically.

The first, and this is imperative, non-negotiable: do the broth yourself. This is just how I feel. Sure, in a pinch you can maaaaybe use one of those reduced broth-on-a-bottle things but never ever use broth cubes to make risotto. Never. They have an aftertaste, an off-flavor that’s really noticeable. So that’s what I think.

Secondly, always buy shrimp with the shells (frozen are fine) and do not rinse the shrimp with water after you’ve pealed them as that just flushes so much taste down the drain.

And hey, one more note: use a nice dry wine, not to sweet.

So about those shrimp:

  1. Preheat the oven to 250 degrees C. Put a big pot of water on the stove. While you wait on the oven to get warm and the water to come to a boil: peel the shrimp.
  2. Spread the shrimp shells (not the shrimp) on an oven pan and when the oven is ready, roast the shells until pinkish white (about 10 min). Image is showing the shells before roasting, sorry about that… I’ll try to remember to update it in the future.
  3. Peel three of the yellow onions, cut them into quarters and put them in the boiling water with the bay leaves, some salt, pepper corns and when they’re ready: the roasted shrimp shells. Why roast the shells you ask? Well, it gets yummier. But why? I’m embarrassed to say: I’m not quite sure and haven’t been able to find anything really useful about it either (please tell me if you know). Let this mix simmer for at least some 30 minutes or so. And by the way, you can put other stuff in the broth. Celery, parsnip, carrots? Go to town!
  4. While waiting on the broth (there’s a whole thing on what’s important when making broth. We’ll do a thing about it at some point I’m sure),  put some butter and olive oil in a pan and take it up to medium heat. Dice the last onion finely (not important that it’s that fine) and put it in the hot pan.
  5. When the onion has turned clear, add the rice.
  6. After a couple of minutes raise the heat somewhat (to 8-9 on a 12-point-scale) and then pour the wine into the pan.
  7. Taste the broth to make sure that it’s salty, shrimpy sweet. It should a bit less salt than you want the end product to be (you can always adjust the salt level upwards later. Too much salt however? Well… you’re kinda stuck with that).
  8. Add a couple of deciliters of broth and start stirring continuously. Why are we stirring? Well, it’s to dissolve the starch into the liquid, allowing for the creamy end result. You don’t have to stir all the time though, but make sure to do it regularly. Adjust the heat to create a light simmer in the pan.
  9. So I listed 1L of broth in the ingredients list but I don’t find it very useful to give an exact volume. It differs with the grain type, the brand and how much you stir. The important part is to continuously add scoops of broth until the rice is almost done. This should take about 20 minutes. Taste both the liquid and the rice when you’re getting close to the 20 minute mark.
  10.  When the rice is just about done, i.e still a bit hard but almost eatable, you should try to adjust the consistency to be runny, quite a lot runnier than you want the end product to be (it will set due to after-heat and further stirring). Grate the parmigiano, put it in with the rest and stir.
  11.  Add the rest of the butter in cubes (should be about 30 g left) and finally: the saffron. Take the pan off the heat and stir.
  12. So this is really the practice-makes-perfect part of the whole shabang. The consistency should at this point still be less firm than how you want to serve the risotto and the rice should be ever so slightly more al dente than how you want it to be eaten. It continues to cook when resting off the stove, which it should do for about 10 minutes. Stir it every couple of minutes. Regarding the consistency I think (and this is mostly a preference thing) that the end result should be such that when you put a scoop of the risotto on the plate, it slowly expands out towards the edges of the plate under the weight of its own pressure. If you (after letting it rest) think that it’s to firm, just add some broth and stir.
  13. Heat a pan to medium/high heat with olive oil. Put one or a couple of garlic cloves in with the oil for a bit. Quickly fry the peeled shrimp (about 30 seconds) and take the pan of the stove. Do this in batches if the shrimp fill up the pan. You want them to be fried, not boiled and too much shrimp = too much water in the pan = boiled shrimp.
  14. Put some risotto on a plate. If you want it to spread nicely over the plate you can punch the underside plate with your palm a couple of times.
  15. Top it off with the fried shrimp, a splash of lemon juice, some black pepper and chopped fresh parsley. Fucking awesome.

…and then put a generous amount of parmigiano on top right, YES! Right..? Nope. Sorry.

I have conferred with my Italian colleague and: no parmigiano on seafood. The gods’ll get piiiiissed.

But hey, maybe you’re just not that religious? You do you.

Leave a Reply

Your email address will not be published. Required fields are marked *